The descriptions below are general in nature and may not apply in all cases. It’s always important to read the customized instructions that come with a syringe. It might be helpful to practice with plain water until you feel comfortable and familiar with handling and using a syringe.
1. Parts of a syringe
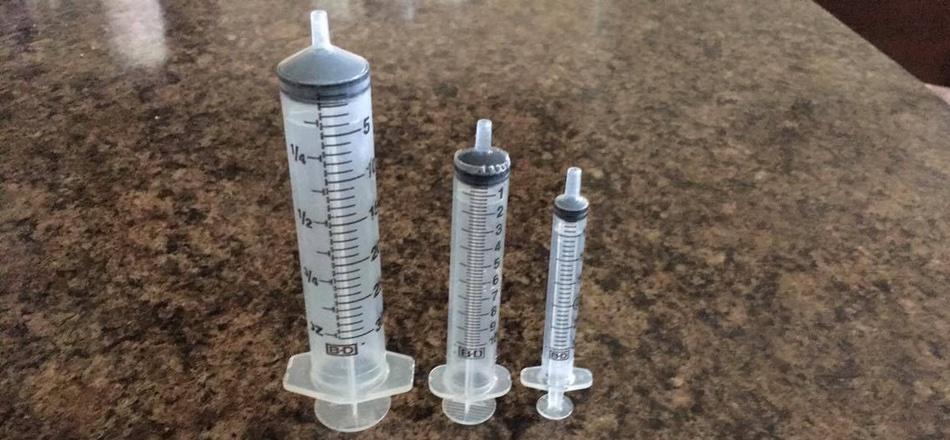
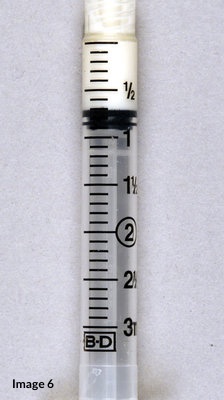
A syringe is made up of three parts: the tip, the barrel, and the plunger.
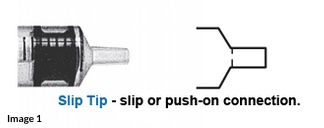
The tip of the syringe is where a needle is sometimes attached. People tapering off psychiatric drugs typically use a slip tip syringe, shown above in the image, always without a needle.
In the image above (not a slip tip syringe), the barrel (#3) is the reservoir that holds liquid. It is graduated with lines (#2) that are typically printed or etched on its surface and calculated in cubic centimeter (cc) or milliliter (mL) units. These units of measurement—cc and mL—are equivalent.
The plunger (#5) is a piston-type rod that moves up and down inside the barrel when the plunger is pushed or pulled using the thumb press (#6) and flanges (#4). At the end of the plunger is a slightly cone-shaped plunger tip (#1). This is what prevents leakage of liquid around the plunger. The plunger tip is also the indicator for measuring the volume of the syringe’s contents.
2. Operating a syringe
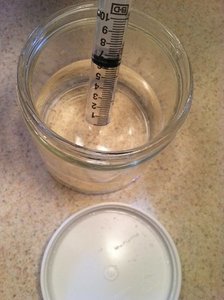
To operate a syringe, first make sure the plunger is pressed down to the bottom of the barrel. Then, place the tip in the liquid that you want to measure. Draw back on the plunger and the liquid will flow into the syringe, as demonstrated in the image above. The markings on the side of the syringe indicated how much liquid you have drawn in.
3. Understanding the units of measurement on a syringe
Depending on the capacity of a syringe, its primary measurement-line markings may be in milliliters (e.g. 1mL, 2mL, 5mL, etc.) or fractions of a milliliter (e.g. 0.1mL, 0.2mL, 0.5mL, etc.). The larger the capacity of the syringe, the more space there will be in between the measurement lines. As a reminder, mL and cc are equivalent units of measurement when reading the plunger.
Syringes with markings in decimals are optimal. If a syringe uses fractions, they’ll have to be converted to decimals for most taper-related calculations.
To convert fractions to decimals, you simply divide the number on the top of the fraction by the number on the bottom. If you don't like long division, it's easy to do using an online or phone calculator.
If a syringe has readings already in decimals, it’s important to locate the decimal point and not to confuse any extra zeros before or after the main number. The leading and trailing zeros before the decimal (i.e. 0.1) and after the last number (i.e. .10) are just placeholders. In other words,
0.1 = .1
.10 =.1
4. Reading the calibration markings
Here's how to read calibration markings on a syringe:
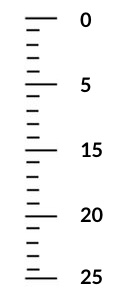
Determine the increment between the visible numbers.
The visible numbers are next to the longer line markings on your syringe, as demonstrated in the image to the left. Determine what the increments between these major markings are. In this image, for example, the increment between the larger markings is 5, or 5mL.
Determine the increments of the smaller markings.
Place your finger on one of the longer markings that has a visible number on your syringe, then count the number of lines between it and on the next adjacent larger marking with a visible number. (In the example at the left, there are four smaller lines between the 0mL marking and the 5mL marking.)
Now divide the number of smaller lines by the amount of mL increase between the longer lines. This will tell you the amount of increment measured by the smaller lines.
In this image, 5mL divided by 5 smaller measurement lines = 1mL. So, each smaller marking on this syringe is equal to a 1mL increment.
See the figures below for other examples.
1mL syringe
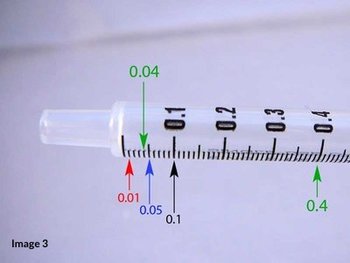
In the image above, the incremental amount between the visible numbers is 0.1mL. There are nine smaller lines between each number. Since 0.1 divided by 10 is 0.01, this syringe allows accurate measurements as small as 0.01mL (or one one-hundredth of an mL).
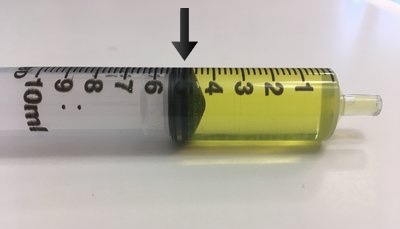
3mL syringe
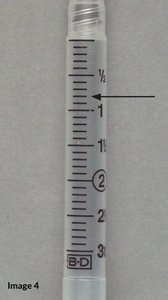
In the image above of this 3mL syringe, the smaller markings designate 0.1mL. These are the smallest-sized measurements you can make accurately with this particular syringe. The arrow is pointing to the 0.8mL (eight-tenths of a mL) marking.
5. Accurately measuring the amount of liquid in a syringe
Typically, the point where the plunger tip makes contact with the barrel is the spot to line up with the amount of liquid being measured. But plunger types can vary across brands and thus may need to be read slightly differently. Some plunger tips are plastic while others are rubber. Some are the same shape as the slip tip opening of the syringe, while others are flat, and still others domed.
Below are some general tips from the layperson withdrawal community for how to read several different types of plunger tips.
Plastic plunger tip in the shape of the slip tip opening
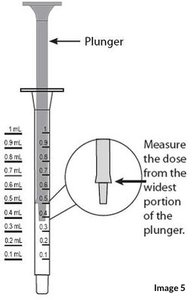
The image above shows a 1mL syringe with a plastic plunger tip in the shape of the slip tip opening. As you can see, the dose is measured from the widest portion of the plunger tip—not from the end of the plunger tip. The image shows a reading of 0.5mL.
Flat rubber plunger tip
The image above shows a 3mL syringe containing liquid with a flat rubber plunger tip. For this particular syringe, the dose is measured by lining up the top ring of the rubber plunger with the desired calibration marking on the barrel. The liquid amount in this syringe is seven tenths of an mL (Translating this into a decimal gives you 0.7mL).
Domed plunger tip
The image above shows a syringe with a domed plunger tip. The dose is measured by lining up the top ring of the plunger tip with the 5mL calibration marking (where the arrow points). This means there is 5mL of liquid in this syringe. Do not use the tip of the dome or the lower ring of the plunger tip when reading the amount of liquid in the syringe.
6. Additional layperson tips for using syringes
- Always make sure the drug is evenly distributed in the liquid immediately before drawing liquid with the syringe.
- When putting the liquid for a liquid mixture or dilution in a jar, it may take several full syringes worth of “pulls” to reach the total amount. To obtain an accurate measurement, it’s often recommended to use a syringe that is large enough to avoid making more than 4 full pulls. (It can help to use hash marks or to push coins aside to keep track of the number of pulls from a syringe.)
- After use, drawing water up into the syringe can help gather any remaining drug residue that may be stuck to the barrel. This “rinse water” can then be drank and appropriately included as part of the calculated daily dose.
- If the scale/calibration markings on a syringe are printed on the barrel, covering the numbers with clear packing tape can help extend its life. Otherwise, the printed number markings may rub off quickly with handling, making the syringes unreadable.
- If regularly using the same amount of diluting liquid in their main jar, some people find it helpful to create a permanent measuring mark for the right amount on the jar with marker covered by clear packing tape, reducing the need for syringes.
- Storing syringes in the fridge can help prevent mold growth.
- When cleaning syringes, many people pull the plunger completely out from within the barrel and leave the barrel and plunger separate to dry. (Note: Some syringes do not allow the plunger to be removed.)
- If the syringe becomes difficult to plunge, some people have found it helpful to try dabbing a very small amount of coconut oil or olive oil on the edges of the plunger (where it connects with the plastic barrel internally) to lube it up. If this does not work, they’ll discard the faulty syringe and use a new one.
- Some find that liquids such as full-fat milk may bubble more if shaken when cold, which can affect the accuracy of measurements, so when using a syringe they let the liquid warm up first before making a cut, or choose instead to stir vigorously rather than shake.
- Bubbles may sometimes appear in the barrel when pulling up liquid into their syringe. This can take up space within the volume and lead to inaccurate measurements. Depending on which taper method being used, laypeople have found the following ways to manage this:
- If using a syringe to draw up liquid from a jar:
- With the plunger completely depressed within the barrel, they stick the syringe into the liquid they’re using.
- Making sure the tip is fully submerged, they then pull some liquid up into the syringe.
- Next, they push down on the plunger as far as it will go to push that liquid back into the container, while still being sure the tip of the syringe remains fully submerged in the liquid.
- With the syringe tip still submerged in the liquid, they pull up the amount of liquid they need into the syringe slowly. This tends to prevent bubbles.
- If they draw up excess liquid using this method, they just push any excess back into the liquid jar until they have the correct amount needed remaining in the syringe.
- If using a syringe to draw up liquid through an Adapter Cap:
- With the syringe tip inserted into the adapter cap opening and the bottle of drug turned upside-down, they draw into the syringe slightly more drug than the amount required.
- If there are bubbles inside the syringe, they flick the syringe with their finger, with the tip still inserted in the adapter cap opening and with the drug bottle still inverted.
- Typically, bubbles rise to the tip of the syringe, at which point it’s possible to push the excess liquid, with the bubbles, back into the bottle until only the correct amount of liquid remains.
- If using a syringe to draw up liquid from a jar: